
Magento 2 引用 Popup Modal

與 Magento 1 相比,Magento 2 讓許多前端 Modal 的使用變得更加容易,特別是在 Popup。 Popup 是一種很好的行銷策略,可立即發出號召性用語,吸引訪問者的注意力並與他們進行深入互動,讓對方更具好奇心的探索網站。 Popup 也可以是提示使用者網站流程的資訊來源,因此經常被各網站使用。 本篇文章,我們將學習在 Magento 2 中創建 Popup。
有時候,開發人員會經歷漫長的手動創建 Popup 過程,然後要使其適應不同的主題時會遇到困難。 這是因為他們不知道 Magento 2 中內建 Popup modal widget。使用 Popup modal widget 是創建 Popup 的快捷方式! 用幾行程式碼即可完成任務,並避免創建時發生錯誤的機率。
Popup Modal 使用方法
Step 1. 在需要的模組中創建 requirejs-config.js
路徑:app/code/CustomVendor/CustomModule/view/frontend/
var config = {
    paths: {
         'myjs': "CustomVendor_CustomModule/js/customfile"
      },
    shim: {
    'myjs': {
        deps: ['jquery']
    }
  }
}
Step 2. 新增 customfile.js
路徑:app/code/CustomVendor/CustomModule/view/frontend/web/js/
<script>
    require(
        [
            'jquery',
            'Magento_Ui/js/modal/modal'
        ],
        function(
            $,
            modal
        ) {
            var options = {
                type: 'popup',
                responsive: true,
                innerScroll: true,
                'title: 'Popup title',
                buttons: [{
                    text: $.mage.__('Submit'),
                    class: 'mymodal1',
                    click: function () {
                        this.closeModal();
                    }
                }]
            };

            var popup = modal(options, $('#custompopup'));
            $("#click-here").on('click',function(){
                $("#custompopup").modal("openModal");
            });
        }
    );
</script>
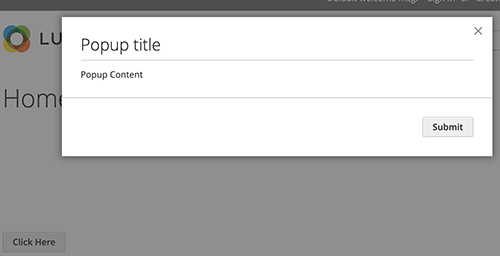
Step 3. 將下面的程式碼放入 .phtml 中
<div data-mage-init='{"myjs": {}}'>
    <a href="#" id="click-here">Click Here</a>
</div>

<div id="custompopup" >
   Popup Content.
</div>
圖片來源:
https://devdocs.magento.com/guides/v2.4/javascript-dev-guide/widgets/widget_modal.html
依照上述步驟,即可創造一個新的 Popup! 非常省時並易於與所有 Magento 主題一起使用。
在 Magento 2 官網上有詳述各種設定上的可選擇參數與方法,有需要的話可以前往參考。
以上就是本次的資訊分享,如果想得到更多Magento相關資訊,請訂閱歐斯瑞電子報,或是追蹤我們的FB及IG,我們將會持續不斷更新!


我要留言